A leaking water shut-off valve can quickly saturate floors, damage drywall, and lead to costly water damage repairs if left unattended.
At ServiceMaster Restoration by Zaba, we’ve helped hundreds of Chicago-area residents recover from unexpected water damage caused by faulty shut-off valves.
Here’s what to do when your water shut-off valve is leaking, and how to protect your home from further damage.
Key Takeaways
- If your shut-off valve is leaking, start by tightening the packing nut. If that doesn’t work, shut off the main water supply, replace the packing washer, and test the valve. Call a local plumber if the leak persists or you’re not confident handling the repair.
- To prevent future leaks, inspect shut-off valves regularly, turn them on and off occasionally to keep them from sticking, and consider upgrading to modern ball valves or installing leak detectors in vulnerable areas.
- If the leak has already caused water damage, stop the water, document the damage, and contact your insurance company. Then, call Chicago-based restoration company ServiceMaster by Zaba to dry and repair the space: (773) 647-1985
How to Repair a Leaking Water Shut-Off Valve
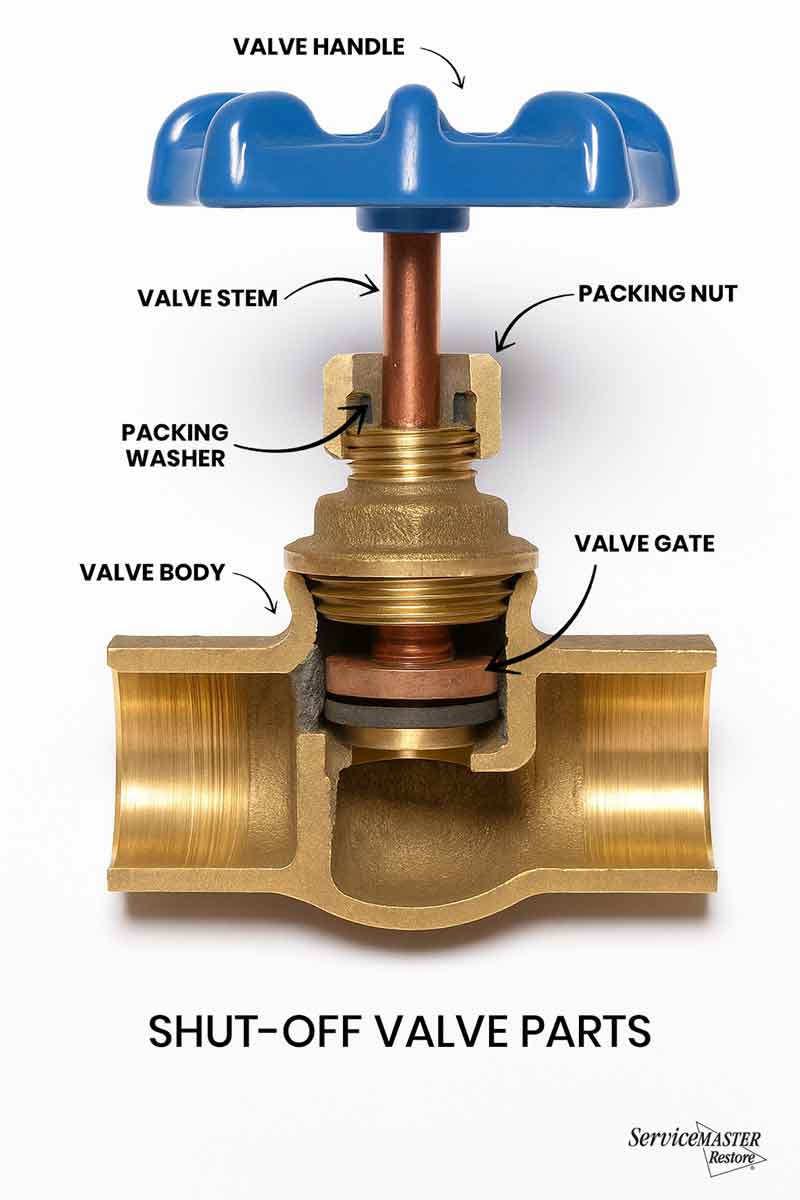
1. Tighten the Packing Nut
- Locate the packing nut: This is the nut just below the valve handle where the stem meets the valve body.
- Tighten gently: Use one wrench to steady the valve body and another to turn the packing nut clockwise about 1/8 to 1/4 turn.
- Check for leaks: Turn the water back on. If the leak stops, you’re done!
2. Replace the Packing Washer (If Tightening Fails)
- Shut off the main water supply: If the valve is leaking and you can’t stop it by tightening, your best option is to turn off your home’s main water supply. In Chicago homes, this is usually located in the basement or near the water meter.
- Remove the valve handle and packing nut: Unscrew the handle and carefully loosen the packing nut.
- Replace the washer: Inside the nut, you’ll find a small rubber washer. Remove the old one and insert a new washer of the same size.
- Reassemble the valve: Tighten the packing nut back into place, reattach the handle, and turn the water back on.
- Test again: Make sure the leak is gone. If it persists, you may need to replace the valve.
3. Know When to Call a Professional
- Persistent leaks: If replacing the washer doesn’t work, the entire valve may be worn out.
- Main shut-off valve issues: If the leak is coming from your main shut-off valve, don’t try to fix it yourself – you may need to coordinate with your city’s water utility.
- Not comfortable doing the repair? A licensed plumber can safely replace the valve and stop the leak.
What to Do If the Leak Caused Water Damage
1. Remove Standing Water
If it’s safe to do so (and water hasn’t reached any electrical outlets), use towels or a wet/dry vacuum to remove standing water to prevent damage from spreading.
2. Document the Damage
Document the damage thoroughly with photos and videos, including the valve, nearby flooring, walls, and any impacted furniture, as this will help with your insurance claim.
3. Call Your Insurance Company
Let them know what happened and start the claims process.
Most policies cover sudden and accidental leaks, especially if the valve failure was unexpected.
We can help: ServiceMaster Restoration by Zaba can assist with your claim by providing damage assessments, estimates, and direct communication with your adjuster.
4. Call ServiceMaster by Zaba, Your Local Restoration Team
If water has been leaking for an extended period, your home needs more than just drying.
Water can soak into subfloors, wall cavities, and insulation, creating the perfect environment for mold.
At ServiceMaster by Zaba, we handle water damage restoration quickly and thoroughly, from water extraction to structural drying and mold prevention.
Common Reasons Why Water Shut-off Valves Leak
Old Age and Corrosion
Many homes in Chicago, especially those built several decades ago, still have their original plumbing systems.
These aging systems are more prone to corrosion, wear, and unexpected leaks over time.
Over time, minerals in the water corrode shut-off valves, particularly those that aren’t regularly used or checked.
Loose Packing Nut
The small nut under the valve handle can loosen with time, allowing water to seep out.
Faulty Washer or Valve Stem
Rubber washers can deteriorate, and valve stems can wear down, especially if the valve is frequently turned on and off.
High Water Pressure
Excessively high water pressure can put stress on plumbing fixtures, increasing the risk of leaks in older shut-off valves.
How to Prevent Future Valve Leaks
- Inspect shut-off valves once or twice a year.
- Turn the valves on and off occasionally to keep them from seizing.
- Replace aging valves proactively, especially in older homes.
- Consider upgrading to quarter-turn ball valves, which are more durable and less prone to leaking.
- Install water leak detectors under sinks and near water fixtures.
Real Results: How We Restored a Skokie Home After a Valve Leak
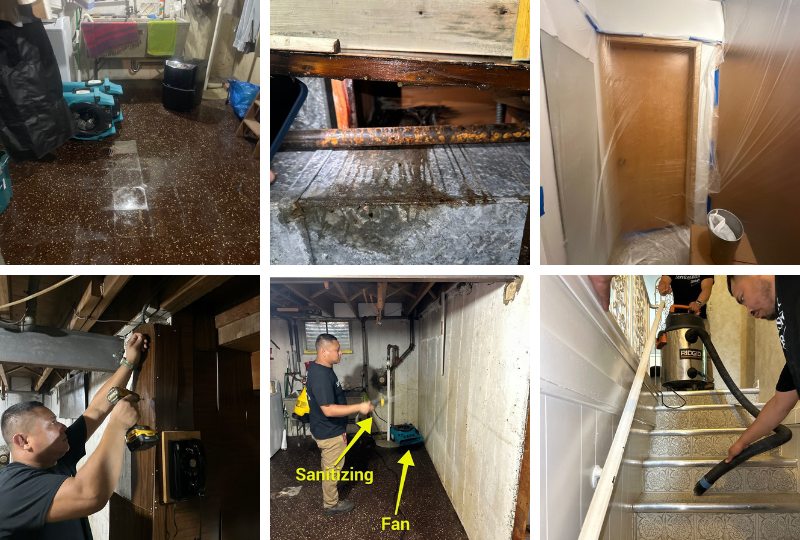
In a Skokie home, a defective water shut-off valve under the bathroom sink in the powder room on the first floor began leaking while the homeowners were out of town for a week.
Because the valve was old, it failed over time and caused extensive water damage throughout the first floor and basement.
The leak ran for several days, affecting multiple rooms and soaking the flooring, walls, and insulation.
Our team responded quickly to stabilize and dry the home. We:
- Removed the vanity, toilet, vinyl tile, and subflooring in the powder room.
- Installed 1 air mover for drying and sanitized the entire space.
- In the foyer, we removed 12 linear feet of baseboards and performed a 2-foot flood cut, followed by cleaning, sanitizing, and drying with 1 dehumidifier and 2 air movers.
- In the rec room, we handled heavy content manipulation, removed wall paneling and baseboards, and dried the area with 1 dehumidifier and 4 air movers.
- The utility room required water extraction and full removal of two paneled walls; we used 1 dehumidifier and 5 air movers to complete drying.
- In the hallway outside the utility room, we removed ceiling tile (30 sq ft), baseboards, and full-height wall paneling, cleaned thoroughly, and ran 4 air movers.
- In the family room, we extracted water from hard flooring, removed paneling and baseboards, and dried the space using 2 air movers.
- The storage room required extensive demolition and content manipulation. We removed all wet drywall, ceilings, and baseboards, and dried the space with 4 air movers and 1 dehumidifier.
Thanks to our quick action, we contained the water damage, prevented mold growth, and fully restored the home.
Did a Leaking Shut-Off Valve Damage Your Chicago Home? We Can Help.
If a faulty valve has flooded your bathroom or home, don’t wait.
Call ServiceMaster Restoration by Zaba. We provide 24/7 emergency water damage restoration throughout Chicago and the suburbs.
From extraction and drying to full repairs, we’ll get your home back to normal.
Call us today at (773) 647-1985 for immediate help.
FAQs
How to tell if a water shut-off valve is bad?
Signs include difficulty turning the valve, leaks around the packing nut or stem, rust or corrosion, or water not stopping completely when the valve is closed.
If you notice any of these, it may be time to replace it.
How do I know if my shut-off valve is leaking?
Look for drips under the sink, rust around the valve, or unexplained water pooling on the floor. If the valve feels loose or corroded, it may be the source.
Can I fix a leaking shut-off valve myself?
You can sometimes stop minor leaks by tightening the packing nut or replacing washers. But if the valve is very old or badly corroded, it’s best to call a plumber.
Is water damage from a shut-off valve covered by insurance?
Most homeowners insurance policies cover sudden and accidental water damage, including leaks from shut-off valves. However, gradual damage or neglect might not be covered. Always report the issue promptly.
How long does water damage restoration take?
Drying typically takes 3-5 days. Full restoration, including repairs and reconstruction, may take 1-2 weeks, depending on the extent of the damage.


